Table of Contents to MTD
- MTD 2026
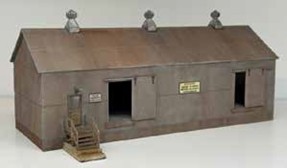
- May 2026 – Modeling Large Industries
- April 2026 – No Discussion
- March 2026 – Today’s Mobile Lifestyle
- February 2026 – Form-Based 3D Printing
- January 2026 – Keep Alive capacitors and Frog Juicers
- MTD 2025
- November 2025 – Operations on Model Railroads
- October 2025 – Cleaning Track
- September 2025 – What would you do different, if you were doing Model RR over?
- August 2025 – No Discussion
- July 2025 – No Discussion
- June 2025 – Static Grass
- May 2025 – Modeling Water
- April 2025 – Making Roads and Streets and Roads
- March 2025 – Modeling Paints
- February 2025 – Gerry Glancy on Tortoise Switch Machines.
Modeling Large Industries
Kevin Ruble’s Presentation
Kevin Ruble started the discussion with a few slides of large industries that have interest for model railroaders. Large rail served industries can be organized into seven basic categories. From last month’s clinic, primary metals and associated suppliers are large industries, some with their own railroads. Chemical and petrochemical plants are very rail intensive. Agriculture and food processing plants tend to be large facilities with a good deal of varied rail traffic. Forest product plants generate heavy rail traffic. Construction materials including stone, clay, glass, and cement plants generate heavy loads that are best moved by rail. Automotive and heavy
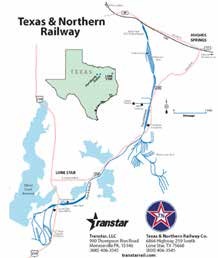
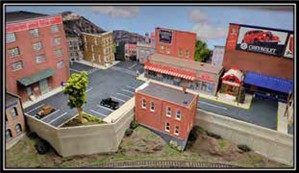
industry plants use many incoming and outgoing rail loads. Short line railroads like the Texas and Northern Railway offer a number of opportunities for modelers. The line interchanges at the north end and continues south to terminate at Lone Star Steel. Historically, the line had a number of yards and spurs to gather ore and materials for the steel mill and other customers. As a small, short line it can be modeled with just the yards and a few customers or concentrate on the mill trackage. There are a lot of modeling possibilities as everything is bigger in Texas. Further, as an example of a large industry layout, the Back Creek Paper in HO scale has all the attributes of the large industry modeled in a 10-foot by 14-foot bedroom. The main processing plants are represented by flats or low relief buildings against the backdrop. Another example would be the Gordon Paper Company, an HO scale layout on a 4X8 plywood top modified with the one corner clipped and moved to extend the paper warehouse and mainline past the plant. Two locations on Mark Shifter’s layout are large industries represented by low relief structures near the backdrop. The industries appear much larger due to their location and the careful addition of background scenery. The beer line was discussed as a modeling possibility as the line services a number of industries besides the brewery. During the transition era and the steam era, the predominate car was the 40-foot box car. That meant that the car was used for a variety of purposes and would be moved from area to area to accommodate the change in load. There are a number of books that focus on industries and can be helpful for modeling the industry.
Rich Gibson’s Presentation
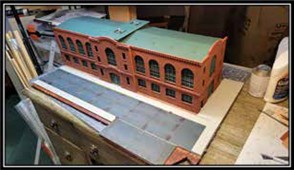
Rich Gibson continued on the discussion with Jim Leighty’s Central New York & New England. Rich was able to operate on this layout in a recent visit. The layout is very well designed and executed in a smaller than usual area. Here again the large industries are located against the backdrop with narrow building fronts representing the bulk of the industry. The layout was about 20 inches wide along the walls on two levels. The industries were very large with one, Bradford Lime Company, about ten feet long. The key to the massive appearance is the depth of the buildings against the wall. To add to the complexity of the operation most of the buildings have track inside. From the operator’s
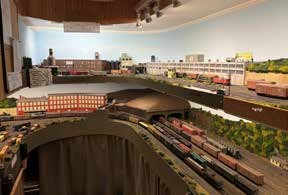
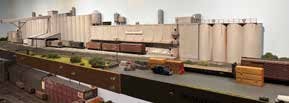
point of view a number of cars on a switch list could be inside the building with other cars to be re-spotted. The key to modeling the large industries is to give the impression that there is more beyond. Angling the building to the layout axis gives an impression of more building beyond.
Today’s Mobile Lifestyle
For March, the focus was on the construction, destruction, and reconstruction of Rich Gibson’s MEC layout. Rich has had the opportunity to move his residence a number of times during his career. This meant that the layout had to be taken down and moved with the rest of the household. The good news is that he has tips and tricks for rebuilding a layout into a new space.

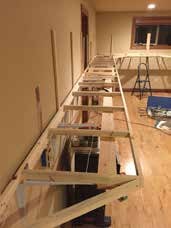
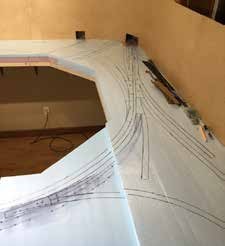
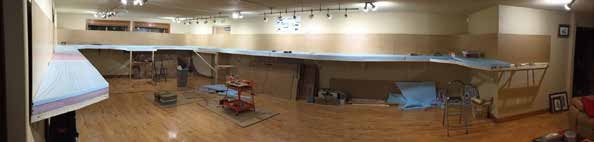
He uses wall mounted shelf brackets for his layout’s base. He can mount horizontal stringers to the brackets at the wall and outer bracket edge. A light weight frame is constructed to mount to the stringers. These are in sections of eight feet in length and are constructed of 1x material in 2,3,or 4 inch depth. One adds the bus wires and then fastens the frames to the stringers with a minimal number of screws. The sections are anchored with carriage bolts and holes are drilled for the bus wires. Kevin Ruble is using a similar technique, but he is only using a single screw for the layout. Mount foam decking to the surface with joints to match frame sections. Draw in the track plan on the foam or use a printed track plan to scale. This is where one must be careful to align the section breaks with the track plan as well as turnouts, scenery, and terrain features. Mount switch motors prior to attaching the sections to the stringers. Lay the track according to the track plan. It was noted that some would prefer to add bridges and other terrain features prior to laying the track. Now add feeders to the bus, connect the bus sections with wire nuts, and connect the bus to power. Time to run trains!
The good thing is that this method allows the layout to come apart and be re-assembled in some fashion in a new location.
Form-Based 3D Printing
The February Modeling Discussion continued a discussion on 3D printing using generators and other CAD based programs to manipulate printing files. As was noted, there are a number window, doors and other building accessory files available to add to your buildings. With some skill, the shutters or other items may be indented into the building walls. Complex roof lines may be developed with the generators and added to the building base. One of the more useful tips is the use of Tinker CAD to strip the fascia boards from a building. These can be printed separately and painted with the separate color before adding back to the building face. Imagine not needing to mask fascia pieces and painting them on their own.
Keep Alive Capacitors and Frog Juicers
Click on the following to see the video: Keep Alives
The January Modeling Discussion focused on Keep Alive capacitors and Frog Juicers. Both are intended to allow smooth running over track power interruptions. The first order of business was to describe the frog juicer. This is an electronic circuit that changes the polarity of the frog in a turnout to match the direction of travel through the turnout. In that fashion the power is not interrupted as the locomotive passes over the frog. This is a track appliance that is part of the layout. Keep Alive goes by any number of names but it is an appliance added to a DCC decoder. It is at its heart capacitor(s) that are charged by track power and store the energy until there is an interruption in the track power. By nature of the installation, it becomes part of a locomotive and can move from layout to layout with the loco. Currently, the Keep Alive circuits are much smaller and able to be installed in many more sizes of locomotives.
There are some instances where the Frog Juicer will be necessary. Old style turnouts that are not necessarily DCC friendly can be used if the rails are gapped within the turnout and the frog area is powered by the juicer. The Frog Juicer can act as an auto reverser with a set of jumpers that make both circuits respond together. The Frog Juicer must be run off the main track power before any circuit breakers on the line. This gives a more reliable operation of the reverser.
The Keep Alive capacitor does not immediately discharge when the layout is powered down, and it is important to allow for all activity to crease. This is somewhat of a problem for lift-out areas and swing bridges, so a mechanical stop may need to be employed. The discharge may also affect throttles.
Operations on Model Railroads
Click on the following to see video: Operations Discussion.
The November Modeling Discussion was facilitated by Scott Ogle. The discussion focused on the OPSIG guide for ops found at: (https://opsig.org/articles/presidentsdesk_oct2025). This gave light to a number of topics on the operations for model railroads. It is good to remember that operations on model railroads is simply an elaborate multi-player board game. The game board is the model railroad with the rules determined by the layout owner to follow a stated practice. These rules and guidelines can be simplistic or very complex.
Some of the discussion items were common sense. Operations bring your layout to life. To start your session the owner/session host needs to hold a pre-op briefing. This should be about 15 minutes and cover the basics of the layout and operations. Safety information should be discussed. An explanation of what to do with bad order equipment or any derailments.
A key to a successful session is clear and simple paperwork. This means easy to follow instructions, direction of travel, clearly labeled towns, sidings, and industries. It is important to have a clear understanding of the layout owner’s intentions. Part of the operating session is layout preparation. The layout and trains need to run reliability and smoothly. A part of the reliability is using the same couplers on all equipment and further similar wheel sets for cars. One of the major parts of a successful session is operator comforts. Define the expectations on drinks at the layout or only available in the lounge. The lounge area is to keep the layout area uncluttered with extra bodies. The layout needs to be well lit, with clear aisles and free of clutter. A regional aspect of the sessions is who is providing throttles and radios. Within the Colorado region, many owners provide throttles and radios for the sessions. In other areas, it is assumed that operators will bring their own equipment. So, it is best for the session host to communicate with the operators the required equipment for the session. As a part of the hosting duties, make sure that operators have activities between train assignments.
An area of some contention is the assignment of duties for an operating session. These can be assigned when the operators arrive, determined beforehand by seniority or lottery, or a buddy system. The importance here is allowing the operators to participate in their comfort zone and provide a path for growth.
There are pitfalls to types of operators. There is the guy that is always around when something breaks. Oops. There is the oracle of knowledge, and he is not reluctant to share. Finally, there is the individual that lets you know he was not invited to a session. Populating your session with any of these types yields an uncomfortable experience for others.
There was additional discussion on operator seniority and how that affects the tone of the sessions. Favoritism can be helpful to assist those who participate in the building of the railroad, but for a limited time.
Generous hosts go a long way in preparing experienced operators to enjoy the layout. Model railroading is fun!
Cleaning Track
Click on the following to see video: Cleaning Track.
The October discussion was concerning cleaning track. The first suggestion was to use IPA, isopropyl alcohol, as a cleaning agent. This was not successful, and the switch was made to mineral spirits. This was the most widely used solvent. WD or CRC contact cleaner was also mentioned and has been used with some success.
Rich Gibson noted that in Tulsa, he cleaned the track and applied graphite. This worked like a charm, until he moved to Golden and tried this method. It did not work at all well and made a mess. He ended up going with mineral spirits. He is using a block of foam to apply the mineral spirits and runs it along the track. To clean the foam block, run the foam over a piece of sandpaper and the surface is renewed. Items that are sold on-line as nail polish blocks are useful for track cleaning as well. These have varied grits on the different surfaces and polish the rails well as fingernails. As the surface wears, it becomes less abrasive. Rich has mounted a block on a stick to reach into bridges or tunnels.
Gerry Glancy brought in an article from “Model Railroad Hobbyist” May 2025 edition. This article goes through the process that Jeff Johnson used to clean and update an unused section of his layout that was incorporated into the current layout. He washed the track and then polished the track with 1500 and 2500 grit abrasive. Jeff used folded cardstock soaked in mineral spirits to clean turnout points. The track overall is cleaned with a block of Homasote soaked in mineral spirits. He finished the cleaning by applying graphite to the tops of the inner rails. The conclusion of the article showed a chart which details solvents with their dielectric constants. The recommended materials include Deluxe Materials Track Magic, Mineral Spirits, and Graphite. Again, the graphite is not recommended in the dry Colorado climate. Those listed are in the non-polar solvent category.
Article from Model Railroad Hobbyist
What would you do differently if you were doing your Model RR over?
Click on the following to see video: Starting Over
Glenn Gibson started us off with a review of his multi-level Santa Fe layout. He used adjustable
shelf brackets on the peninsula to form the sloping track and scenery. This worked well to layout
the levels and establish the spacing between levels. The bracket system did not work well for the
cookie cutter style plywood base. The next time, Glenn will use wood brackets cantilevered off
the penisula wall to support the base. The construction technic he used involved the construction
of U-shaped wood brackets fitted to the steel supports to anchor risers.
The next presenter, Chuck Koch related the difficulty with powered turnouts. The layout was
about 30 inches deep and the innermost tracks were difficult to reach. He tried Toroquise
machines but these were difficult to install. He changed to servos with Arduino control. He
ultimately had 20-25 servos with four Arduinos to control the turnouts and associated indicator
lights. He moved and so the layout was scrapped. His current layout under construction has all
manual turnout controls.
Roland Lawrence related that he did not choose an era to model in N scale prior to purchasing
rolling stock. This means that his collection includes a variety of eras. He is trimming his
collection to 1970’s to present. He has many cars to sell to limit the years represented.
Rich Gibson summarized his layout miss-steps and changes into six things that he learned about
layout building.
- Don’t over build your benchwork.
- Furniture grade material is not required.
- Hang as much as you can from the walls
- Keep the weight to a minimum
- Plan your lighting with the layout.
- Design lighting to match layout – light to follow the layout with uniform intensity
- Recessed lighting is always a problem
- Avoid direct spot/flood lighting – many hot spots and shadows
- Keep everything in reach.
- Maximum depth for interaction with trains is 24 inches
- Narrow shelves maximize aisle space
- Simplifies construction and operation
- Minimize poorly accessible hidden trackage.
- Avoid creating spaces that are difficult to access for cleaning, maintenance, rerailing, and staging
- Design for everything accessible from above
- Standardize between brands.
- Use the same wheels, couplers, decoders, and track
- Gives you familiarity with brands and operation to eliminate the inconsistency
- Simplify the electrical wiring of the layout.
- Manual track switches
- Minimize control panels
- No signals
- No automation
- No lighting
In summary, concentrate on the elements of the hobby that you enjoy and minimize the less favorable aspects of the hobby.
Scott Ogle gave us a little rundown on his layout planning process. Basically, he built before and while he planned. He would recommend before you start, you operate on everyone’s layout. You learn a great deal. Many great ideas are out there to be found. He wants more staging and more staging. So, the theme here is to keep learning about the hobby.
Modeling Static Grass
Click on the following to see video: Modeling Static Grass
The June Modeling Demonstration was applying static grass. Rich’s Christmas present for one year was a static grass applicator from Germany. The Noch applicator is nice, but the unit is a touch large. Static grass is loose thin fibers of selected lengths in a variety of colors. The unit is an electrostatic applicator that dispenses the fibers and because of the charge the fibers stand up. This is more convincing than ground foam laying on the surface. The applicator has a reservoir to dispense the fibers, a battery to supply the charge, a small circuit board to boost the charge, a round metal plate at the top of the reservoir, and a lead with an alligator clip to anchor the charge on the layout surface. An added wire is placed in the reservoir to conduct the charge from the plate to the screen. This helps to get more vertical fibers. Rich’s preferred glue is white glue at full strength. There are smaller units that could work. The other piece of equipment is a small vacuum. This is to pick up loose fibers and any over spray of the fibers from the layout. These fibers may be recycled. Rich uses a mixture of Wood Scenics static grass and Silflor static grass. The static grass is best at 4mm length. The conductivity to the layout can be accomplished through a pin in the surface, but Rich just clips the alligator to the nearby track. The surface is painted with earth tones. The surface to receive the grass is painted with white glue. Charge the applicator with the desired color or colors. Apply the grass fibers in a circular motion to get an even distribution. If you wish to have clumps of grass, just dab the glue in the area with voided spaces to keep the grass off. The vacuum can clean up the area and allow a review of the work. If the glue has not dried, another layer can be added to the area. Stacking of the fibers is accomplished by misting the previous area with hair spray and then applying the fibers over the misted area. The results are quite interesting, adding more texture to the layout surface. The resultant installation is durable and will withstand cat assaults.

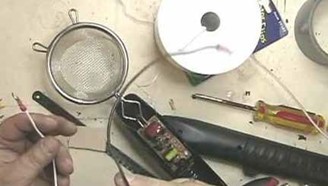
Glenn Runkewich added to the discussion. The pet trick for static grass is to build your own. An electric fly swatter from Harbor Freight or others can be modified as a simple version. The swatter is cut off and a small sieve is used in its place. The wiring is a little difficult as the wire convention in the fly swatter is not uniform. YouTube videos are available to give good instructions for this modification. You will need to add a wire and an alligator clip for the ground.
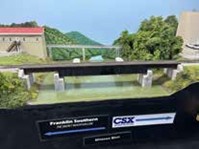
Modeling Water
Click on the following to see video: Modeling Water
This month’s modeling demonstration was wet and wild. The focus was on modeling water. This is a wide-open topic as there are many types of water encountered on the track side. The consensus is one should use a two part resin to model the water. This has some difficulties as the material is low viscosity and will find any and all openings in the bed to flow through and out of the desired area. Gerry Glancy uses Envirotex for his water projects. It is very clear and makes a convincing deep water. The material will creep up the sides of the channel and up on rocks, logs, or other scenic materials that are in the pour area. Pour the material to 1/8-inch thickness at a time. If you need deeper pours, just continue to place more material on top after the layers have set. The material takes over 24 hours to dry. To eliminate bubbles in the pour, breath on the material and the bubbles will disappear. To add moving water effects, Gerry uses Woodland Scenics Water Effects to add waves or ripples. One can follow up with white paint to dry brush the tops of the undulations.
Rich Gibson added rather than pouring the material, he uses an eyedropper to place the material where he wants it. This keeps some of the creep out.
Mark Shifter has been working on a number of water courses on his layout. The main river is the Tuckasegee River. This river has a variety of color hues depending on the time of the year.
His first body of water modeled was Deep Creek. This was where the first leak was discovered. By going under the layout and forcing caulk in the area, the leak was stopped. To create ripples in his streams, he applies Mod Podge on the surface and using an airbrush with no paint, the ripples are added.
The next area is the Hiwassee River. To color this water body, Mark used Woodland Scenics Murky Tint with other colors to make the desired color. These tints mix the same in water as in the resin. Testing can be done by trial and error to match the scenic back drop.
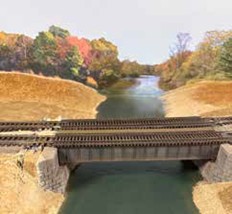
This photo is Tuckaseegee River in an area where the water is browner. This area was painted first and when the color seemed correct the murky tinted resin was placed.
Scott Creek outside of Sylva, North Carolina has more rapids. This uses a different technic to create the rapids. He used the water effects with the addition of Vallejo Weathering Effects – Snow. This product dries with a matte finish which can be corrected with Mod Podge gloss. This adds not only the rapids color but texture as well. He used this technic on many of his modeled rivers to add rapids.
The products he uses include a two part epoxy from Amazon as the color is not important as tint is added to all the waterways. Woodland Scenics sage green, olive drab, and murky tints to color the resin. Mod Podge glossy is used over the resin to create ripples.
His latest project is still under development. Acrylic paints were used as the base. Arizona Rock and Minerals sand, talus, and ballast were used for the stream bed rocks. The plan is to cover the stream bed with a deeply tinted resin.
Rich Gibson added his perspective on the color of water. Be careful of using low angle photos to determine the color. Google Earth arial photos have a better representation of the colors. Looking at the middle of the country, rivers should be green. Bluish green can be found further downstream. One needs to be careful as the Google images are made up of a number of images taken over a period of time. The images are placed side by side and are not merged into a single image. Arial photography intended for design purposes will sometimes be merged and color corrected to give a better representation. This is not the case with Google or any similar internet sites. Moving into Canada near the Rockies, the water bodies are bright turquoise in color. Maine water bodies are dark blue for the rivers and in the tidal areas water is light blue. The South Platte has a variation in color depending on the location. The mountain areas has darker blue color. Within the city, the water changes to a greenish tint and finally to a brown color. The Animas River has a turquoise hue but changes to orange particularly after a large rain event.
Rich went further into his bag of tricks for modeling water. He uses two colors of house paint, a lighter blue shade and a darker blue. He has mixed in some brown tone paint into the one blue for tidal flat mud areas. He uses Mod Podge on some occasions if he doesn’t mind a little white tint. He uses a more expensive gloss medium to finish the surface in critical areas. Rich paints the water bed with paint and then coats the surface with Mod Podge or gloss medium. He stipples the surface with a brush to give texture to the surface. He paints over the surface for a more uniform finish and then uses the final coat of the more expensive gloss medium. One of the important aspects of the modeled water is blending the colors to match the back drop photo water color. This is adding further colors to the surface to aid the match.
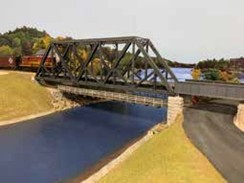
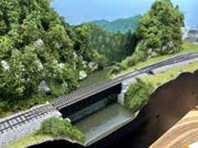
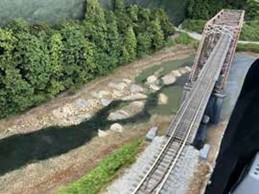
As one can see in this photo, the river has a darker area to the left of the river in both the backdrop and the modeled river. The lighter area is replicated to the right of the river. This helps to tie the modeled scene to the backdrop scene.
Modeling smaller bodies of water is completed using Woodland Scenics Realistic Water and the Murky tint noted above. Rich notes that he always puts his water on Masonite. This is stable and will not de-gas with the application of other materials.
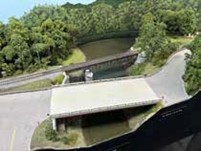
Glenn Gibson, in his absence, shared his technique with Rich. He uses Woodland Scenics Deep Pour Water. The photo shows his results of the Purgatoire River through Trinidad, Colorado. This is a clear waterway with submerged rocks.
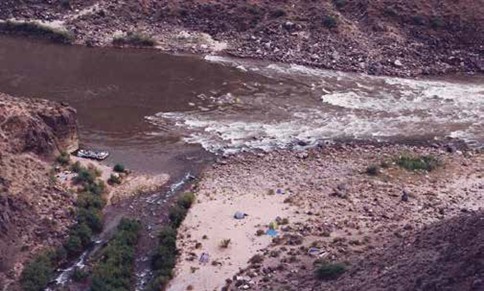
To wrap up the discussions on water, Glenn Runkewich shared his experience in reading the river from his rafting adventures. His first photo was of Lava Falls in the Grand Canyon. But not all the river is like this 99% is rather calm. The action of the water is affected by the shape of the river bottom, rocks, and the shoreline topography. The majority of the water flows in the deepest part of the channel. This is where obstacles have less influence. Curves in the channel force the water to flow to the outside of the channel, cutting the banks or interacting with the rocks. Pillow rocks are submerged rocks in the channel that create water piling on the rock and speeding around each side. The downstream side of the pillow develops a hole, where water is piling in from all directions. The white water is all downstream of the pillow. Intersecting streams influence the river by adding sediment or rocks immediately downstream of the confluence. The white that one sees in the river is actually a three-dimensional phenomenon. The bubbles are interspersed through out the water. With this the modeling should really show some depth to the white.
Making Roads to Streets and Roads
Click on the following to see video: Making Roads and Streets
This month’s modeling demonstration was focused on “Making Roads” which morphed into “Streets and Roads”. The “Streets” portion of the discussion focused on the Walthers Cornerstone Street systems in asphalt, concrete, and brick. Glenn Runkewich used the asphalt system on his layout. The difficulties are as found in any pre- manufactured product that needs to be kit-bashed to form your idea. The kit paving pieces have a molded in crown and a curb at the outside edge.
Glenn found these points to the system:
THE GOOD
Modular – many configurations
- intersections and curves
- can be kit-bashed
Details – sidewalks, curbs, manholes, drains, driveways, fire hydrants
Pavement – asphalt, brick, concrete, crown and gutters
THE BAD
- streets not roads
- seams hard to hide
- crown complicates kit bashing
- pricey
The top photo shows a more typical street installation. On the bottom photo an alley way was made by turning the street section. The left photo shows an installation along a street where the crown molding and curbs needed to be cut down. This leaves the regular pattern on the street that will be difficult to hide. What is notable about this product is the fine-grained asphalt texture. A box of parts was passed around for the participants to observe.
Gerry Glancy brought in a similar set of street parts in the concrete finish so the differences could be seen. Glenn Gibson noted that he used the brick pattern set for his Trinidad streets.
It was suggested that the joints could be filled with Glass Gallery Leading. This is a liquid product, or sold in strips. It is a bright product, but can be painted. It can also be used on roofs at the edge and around roof accessories to mimic the tar bands commonly found near roof openings.
Gerry Glancy showed us the street track inserts, also from Walthers, that can be used to bury tracks running in streets. These are concrete colored panel pieces to fit Atlas snap track in a number of straight or specific curved pieces. The side panel pieces are molded to fit over the spike detail adjacent the rail for a tight fit. Turnouts are accommodated by specific pieces that fit up to Atlas snap track turnouts.
Rich Gibson and Mark Shifter tag teamed the presentation on roads. As “they have gone down the same road” using EVA foam cut to width on their respective layouts. This material is available in varying thickness, but the presenters use 2 mm thickness. The material is available in sheets and rolls. It is capable of being cut to any shape for roads or parking areas. It accepts paints and weathering. It can be striped with paints by masking the line and painting. There was a spirited discussion of wheel paths on the asphalt surface. Why are the paths sometime whiter and other roads darker? The prevalence is for dark wheel paths due to tire wear. The surface of the road has some variation and yields differing wheel path colors. Mark uses the foam material for his concrete roads and gutter pans by painting the material grey and weathering it to a concrete patina.
Another method for a road surface is to use joint compound to build up a road section. This material always cracks so it is a natural road material. It is difficult to get a smooth uniform surface on the first try, and subsequent applications will have a different texture and color. Rich Gibson brought a couple of examples from his previous layout to show.

While not really visible in these small photos, there are areas of differing texture along the edges of the roadway. Mark Shifter showed the Micron Pens that he uses to make cracks and joints in the roadway. These are art pens available in a variety of tip sizes and he uses the 0.05 mm size for his work.
The use of Woodland Scenics paving tape was discussed as the edge form for the roadway. This works good for the edge but needs to be removed soon after completion. The use of styrene strips for curbs was also noted. This allows for curves and shapes along the roadway.
Finally, the subject of gravel or dirt roads was discussed. Rich Gibson uses a combination of natural materials to use as paving material. Mark Shifter uses fine sand but mostly un-sanded tile grout from Home Depot. This material is available in a variety of colors and is very fine-grained to mimic the weathered gravels found on roads.
It was also noted that the gutter sands can be screened to find a variety of sizes and re- used as model road surfacing.
Utilizing roofing shingles as a surfacing material was noted. It does not seem that any of the group had tried this yet. Preprinted road material is available in rolls, but curves are limited to a fixed radius. One technique that had been used is the captured Google Earth road images, resized, and stitched together in Photoshop. This gives the modeler all the road appurtenances and authentic crack patterns for your model road.
Modeling Paints
Click on the following to see video: Modeling Paints
The second installment of the modeling demonstration was hosted by Rich Gibson on Modeling Paints. He started the discussion by noting that using solvent paints like Floquil in an airbrush was too difficult to clean up. He transitioned to Polly S Railroad Paints, and they have been discontinued. Many modelers maintained a supply and have been using the supply until exhausted. He has been using rattle can paints.
Rustoleum Camouflage Brown is used for track painting. The khaki may be used as an aged concrete color. Ace primer colors are used for other work. Grey is the tree trunk or asphalt shingle color and red for brick buildings or large rust patches. Tamiya primer is the go to product for priming structure kits, particularly the resin kits. It comes in a variety of colors. Rich still has some Scale Coat spray cans and uses this on metal items. This includes brass car sides, locomotives, and brass detail parts. The line has been discontinued and although a new owner has been rumored, no items have been produced. There was a discussion on decanting paint from spray cans for use in an airbrush or brush painting. The general consensus was that this was okay for touch up brush painting but was not a good idea for airbrushing. The reason for this was conjectured that the problem was with spray can nozzles that were not producing a consistent spray pattern. Rich indicated that he has increased his use of craft paints. He uses this on wood structures with a dry brush to pull out the grain of the wood. For
railroad specific colors, Rich has been using Tru Color paints. These colors are accurate for Maine Central paints. They also have a range of boxcar reds. This lends variation to the fleet. Using these paints yields a nice glossy finish so no gloss coat is necessary for detailing the car. Gloss coating can be done with Pledge floor polish that used to be called Future floor polish. This yields a good gloss coat with a minimum of cost. Clean up can be done with Windex or windshield washer fluid. To cut the gloss, the models can be coated with Testors Dull Coat. Mark Shifter noted that he has moved away from using an airbrush. He uses the rattle can paints on his rolling stock, and structures. He is using inexpensive acrylic paints for his backdrops and other scenery work. He is using wood or Masonite to clean the paint off the track and further to clean the track regularly. It was mentioned that 3 in 1 oil can be used on the top of the track prior to painting. This allows for easy clean-up after painting. This requires care to avoid applying too much oil resulting in the oil soiling the web.
As somewhat of a counterpoint to painting, Glenn Gibson brought in his latest modeling efforts. These were all Walthers plastic kits. The Cornerstone Industry Office was the first structure shown. He used rattle can paints to color the structure prior to weathering. This structure is molded in yellowish plastic and the paints turned into a convincing brick and wood tone structure.

The Cornerstone Rural Grain Elevator was not painted. The structure was dull coated and weathered with powders.

The Cornerstone storage shed was again weathered with powders and detail painted to bring out the different materials.
Gerry Glancy on Tortoise Switch Machines
Click on the following to see video: Tortoise Switch Machines
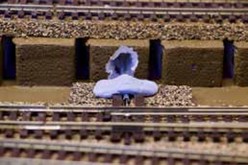
Gerry Glancy, being ever the pioneer, presented the initial modeling topic on Tortoise switch machines. These are the stall motor devices for throwing turnouts on the model railroad. They can be activated by switches, DCC accessory decoders, or an AC steering diode arrangement. These have been available for about 40 years. There have been some changes due to changes in suppliers for the circuit board and the edge connectors available. The modeler needs to be aware of this as older versions can still be found in the marketplace. The flimsy wire that is supplied with the machine is not suitable for most installations. A heavier gauge music wire or piano wire should be used and is available from Ace hardware in a 0.032 or 0.039 thickness. The wire is bent to the proper shape and with practice this becomes automatic. The holes in the Tortoise need to be enlarged for the larger gauge wire with a twist drill. A template for drilling and positioning the Tortoise should be used for alignment.
There are commercially available templates, use the paper cut out from the instructions, or make your own from styrene. Gerry would recommend a brad point drill in 3/8 inch for making the benchwork hole. The brad point helps to keep the bit from wandering as you start the hole. A DeWalt set of brad point drills is available from Home Depot, Lowes, or Ace Hardware. To aid in installation, it was recommended to use a light as a cell phone light over the hole to show where the wire should be fed. The replacement wire is much harder than normal, so it is best to use a dedicated pair of heavy cutters or a cut off tool to trim the wire. There was discussion on the location of the throw rod, and it was suggested that using the offset end of the switch throw was better than the center of the throw bar. To help in positioning the unit below the benchwork, use hot glue on the face of the machine to hold it in place and yet allow some final positioning to take place.
To enlarge the footprint of the Tortoise, it can be mounted at the work bench on a 4 x 4 or a convenient size piece of Masonite, styrene, or plywood, and then the assembly may be mounted to the benchwork with screws positioned away from the machine itself. The Smail is another version of the switch machine with a DCC accessory decoder built in. This can then be programmed as an accessory on the layout and controlled by the DCC throttle. This unit cannot be wired for indicator lights. These should be programmed prior to installation to allow the use of the programming track. Tortoise may be added after the fact on the layout, by modifying the head block ties, drilling the hole, remounting the ties, and completing the installation.
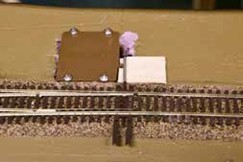
Alternatively, the machines can be surface mounted as shown in Scott Ogle’s installation.
Gerry noted that a track short is encountered when using the tortoise to power the frog. The internal switches on the tortoise can be activated prior to the points leaving contact with the powered rail. By adjusting the throw wire this difficulty can be prevented. The modeler needs to be aware this can occur and that there is a fix.
If the modeler has access to a 3D printer there are files for remote control inserts and other accessories on: https://www.thingiverse.com/.
Rich Gibson noted the machines may be mounted to foam with caulk. He further noted there are few reasons to have powered switch machines on a model railroad. If the turnout is not accessible, it is a good idea to power the throw, or in the case of CTC control for the layout, it is necessary to allow the switch control to be triggered remotely. Wally indicated that all the railroads he worked on the switches were thrown manually.
Rich Gibson has located a lower profile switch machine from: https://modelrailroadcontrolsystems.com/. They are located in Mountain View, California and have a reasonable shipping policy.
Hankscraft Switchmaster motors were mentioned but they are supplied by: http://www.builders-in-scale.com/bis/sm-home.html. The website notes they are moving out of storage, so the editor is not certain how available they may be. Servos were noted as being available to perform the switching duties. These are very flexible as the throw distance is adjustable. They are readily available in hobby stores that focus on radio control hobbies.